After months of going back and forth on rather I really need a Silhouette, I have finally decided to buy the Silhouette Portrait! I plan to order it tomorrow as I need to wait for payday first...darn bills got in the way...and of course Christmas and feeding family that was in town. I am excited about getting it. I really want to add the options of applique or names to my sewing items and the Silhouette will be perfect for that. I will be buying the fabric blade as well. It should be in by next weekend I hope, which is fine as I have tons to do around here...Christmas Cyclone 2012 hit pretty hard. :) Little Bit got WAY too much stuff and now I have to find places for it all. Mom and I took down all the Christmas stuff today and Hubby put it back in the attic. Now to clean and do some rearranging as I want to re-do the living room and Little Bit's room. Just moving furniture, nothing major.
Speaking of Christmas, Hubby got me some Titans PJs (so cute), a shirt with a sewing machine on it (super cute), a chain for my charm I have had since 2003, and a waffle maker (made waffles this morning). It was a good Christmas. Little Bit got her new Tweety she asked for, along with some dinosaurs, Thomas the Train track, Ballerina outfit, sleeping bag, clothes, and I forgot what all she got from everyone. She is one spoiled child. :)
I hope everyone has a great New Year. Not sure what we will do. My parents will be back in town; Mom is still here and Dad is coming back Sunday. Jamie and I might go out to eat early then come back and spend time with the family.
Update: Ordered and in the processing of shipping!! Should have it by Jan 8th if not a few days sooner! Yay!
Thursday, December 27, 2012
Tuesday, December 25, 2012
Holiday Sale Dec 25 - 31!
~*~*~Holiday Sale! Use code MERRY from today thru Dec 31st to receive 25% the shop! Excludes custom orders~*~*~
Have a blessed Christmas and New Year!
Have a blessed Christmas and New Year!
Monday, December 24, 2012
Merry Christmas
From our family to yours, I hope you have a blessed Christmas!

Getting ready to decorate Santa's cookies!

Sunday, December 16, 2012
Baby Emma's Christmas Onesie
So rather Little Bit thinks Baby Emma needs a seasonal outfit for each holiday, I think she does. lol So I made Baby Emma's Christmas Onesie last night. I took scrap fabric, cut out rectangles at different lengths, then I used my ruler to cut them at an angle. I use smaller rectangels for the "lights" and just hand cut out a small star. I sewed around the edges with a straight stitch and along the center of the lights. And done! Baby Emma loves it. lol I haven't gotten a picture with her in it yet, but I will update when I do. :)

Thursday, December 13, 2012
Yup, I love Grab Boxes!!
So remember the Crafty Mystery Box and the Pick Your Plum Grab Box? I got another Pick Your Plum Grab Box this past Saturday.
LOVE IT!! I was going to wait until Christmas to open it since I told Mom I would share with her...I could not wait so I Skyped with her so she could pick out what she wanted. lol Yes, I am silly but that is ok!
So here was what was inside. Sorry for bad pictures, I have a 4 year old that thought everything was for her. lol


This is a white long sleeve t-shirt, I think black leg warmers and grey arm warmers, I think. lol


Metal plates, so cool...now to search on what to make with them.


Bunchy scarf...Mom claimed it. lol


And headbands that went directly on Baby Emma's head. lol

I can't wait for another one because I will so be trying to get one again.
My daughter trying on my leg warmers and fingerless gloves:
Monday, December 10, 2012
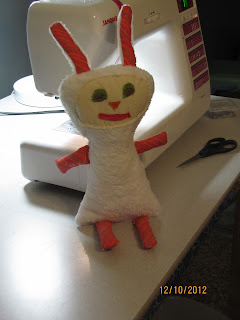
Stuffed Rabbit?
I have seen all these cute stuffed animals around Etsy and other sites so I thought I would try to make one for Little Bit.
No picture but I just drew up a mock picture and used it as my template. Here is the pieces cut out, one for the front, one for the back; I used a Minky material.

Next up is the face. I used scrap material and just sewed them on. I like the contrast thread, it gives it that handmade look.

Next up was the arms, legs and ears. I just made little tubes for the arms and legs and stuffed them (I was very technically on how I stuffed them, lol). I did not stuff the ears since they had minky backing.


Lay out the arms, legs and ears where you want them to go. Remember to fold them in before you pin the back piece on. Once all arms, legs, and ears are in place and pinned, sew around the body, leaving an opening for turning. Turn it out, stuff, sew up the opening, and enjoy!


I hope Litte Bit likes her "rabbit", we shall see. I will update later with a picture, if she likes him and will pose with him. lol He might scare her...I hope not.
Side note: As I was turning this little one inside out, I had a flashback to the Popples...remember those?
UPDATE: Did she like him?
Well Little Bit took Rabbit with her to therapy, along with several other toys. In OT, they built a gingerbread house and on the way home, the bag with the toys fell on it and got icing on them. Once we got home, she got to playing with her dinosaurs and pom poms so I grabbed the toys and threw them in the wash....this is what happened when she realized Rabbit was gone:
Ok, I can't get the video to upload. Lets just say "IT WAS THE END OF THE WORLD!" She cried for a while, got her distracted with a bath but as soon as she got out, she wanted Rabbit. Luckily I got him out first and put him in the dryer alone so he would dry faster. He is now snug as a bug in a rug with Little Bit holding him tight. I say she liked him. :)
Wednesday, December 5, 2012
Meet my new Mascot!
Phil!

I asked Jen Yurko, digital scrapbook designer extraordinaire, to design me a new logo for my Etsy shop. It took me a while to decide on a mascot but I finally chose the Black Sheep with P4:13 on him. Here is why:
P4:13 - "I can do all things through Christ who strengthens me". This is my favorite verse and it holds true every day if I let Him.
Black sheep - I always felt like the odd ball in the bunch but I am ok with that now. I am me and I am happy with me. Society tends to make anyone different feel insecure, but I am here to say, don't let them. You are special, uniquely made. I am proud to be me, even if everyone sees me as a "black sheep".
I hope you see Phil as ray of hope and love, as I do.
Hugs and lots of Love!
Thursday, November 29, 2012
Weighted Sensory Blankets
Since most of my sales have been for custom weighted sensory blankets, I thought I would share some of the pictures of them. I don't have all as I forgot to take pictures of the first few. I can make any size, any weight and any fabric, just ask. I will discuss your color or theme preference, fabric for both sides (cotton, flannel, fleece or minky), and once we agree on the colors, size, weight and fabric, I set up the custom listing for payment. Per my policies, I ask for payment up front to help buy the fabric. I try to get all blankets made within a week of payment but I note it could take up to 3 weeks, especially if I have to order the fabric but I always keep you updated on the progress. I do have a 4 year old remember. ;) A note on the blankets, after several designs, I found that using muslin inside gives an extra barrier for safety. I also leave about 1 1/2 inches on the sides so the weight is centered and that the pellets are not right on the edge. All blankets (minus the laminate one in my shop) are fully washable and can be dry. In fact, all blankets are washed and dried before shipment. I wash and dry my daughter's weekly; it is about 6 months old and looks great still. If you have any questions, feel free to ask!
The first two are some I sold early on:


The first two are some I sold early on:
Cotton with felt backing

Flannel on both sides (loved the colors of this one)

These are custom order blankets I made. All fabric was approved by the buyer before I started. I always send pictures before hand so they can approve. Nothing is done until the final approval and payment.
John Deere Flannel and cotton backing

Organic cotton front with minky backing

Dora cotton front with pink cotton backing

And this is the one that started it all. My daughter's blanket. It was redesigned a few times before I got a design I liked and worked well. It is cotton front (she picked out the fabric) with a minky backing. I also made her the pillow case that Buster is laying on. :)

Tuesday, November 27, 2012
Scrappy Keychain
So my sister found this tutorial and asked if it would be hard to do for the Annual Girls Only Christmas Party we have with the family. I told her no. I bought the keyrings ($4), the webbing ($1/yd) and just used scraps of fabric and Warm & Natural batting. I followed her tutorial just as a guide since I used batting and not interfacing. Mine are not super stiff but they are not flimsy either. The batting was a low loft so it gave it just enough firmness without over doing it. I also used 3" long webbing because the 2" didn't do well with the size of circle I used. I used the lid for a large mason jar as my circle template. I think they turned out super cute. I made 15 in probably a little over an hour, cutting and all. Super easy.
Simple instructions (no pictures):
Cut out 2 circles from scrap fabrc
Cut out 1 circle from low loft batting (Warm & Natural works great since it is thin, yet firm)
Cut 1 strip of webbing (3" was best for my size circle, but try different lenghts for your taste)
Need 1 Keyring
Sandwich the 2 scraps of fabric and batting (scrap right side down, batting, scrap right side up)
Sew around the circle, leaving an opening wide enough for the webbing
Use your Pinking Shears to trim around the entire edges
Insert your webbing with the keyring on it, into the opening
Sew close (backstitch for durability)
First one I made:

The group of them:

Simple instructions (no pictures):
Cut out 2 circles from scrap fabrc
Cut out 1 circle from low loft batting (Warm & Natural works great since it is thin, yet firm)
Cut 1 strip of webbing (3" was best for my size circle, but try different lenghts for your taste)
Need 1 Keyring
Sandwich the 2 scraps of fabric and batting (scrap right side down, batting, scrap right side up)
Sew around the circle, leaving an opening wide enough for the webbing
Use your Pinking Shears to trim around the entire edges
Insert your webbing with the keyring on it, into the opening
Sew close (backstitch for durability)
First one I made:
The group of them:
Thursday, November 22, 2012
Happy Thanksgiving!
Going on right now in my shop is a 10% off sale (no custom orders though)! Use the code THANKS to receive 10% off all ready made items. The sale will run through Monday!
Any have one thing on their list they want to get on Black Friday? I am hoping to score a good deal on the Silhouette Portrait. Though hubby has hinted he may have already bought me the Cameo, so we shall see tonight when I stay up to try to buy one. lol
Any have one thing on their list they want to get on Black Friday? I am hoping to score a good deal on the Silhouette Portrait. Though hubby has hinted he may have already bought me the Cameo, so we shall see tonight when I stay up to try to buy one. lol
Saturday, November 17, 2012
New item in my Shop...
Just in time for Christmas. I love the colors of this line; it is Riley Blake's Santa's Workshop. So fun and bright! I might just have to buy some more for me. ;)

Friday, November 16, 2012
Gobble Gobble Part 2
Ashlee got a doll for Christmas last year, her name is Baby Emma and I tend to make things for her to match Ashlee, or at least go with the holiday. Today I made a oneise with a Turkey on it. I used some square and circle fabric shapes I got out of Pick Your Plum Grab Box a few months ago.


Wednesday, November 14, 2012
Silhouette here I come!
I have decided to save my birthday money (it was yesterday). I am going to buy me a Silhouette Portrait. I know the Cameo cuts a bigger width but I just don't have the extra $100 for it plus I want to use it for my applique stuff for my sewing so I think the 8" width will be just fine. Since the Portrait comes out on Black Friday, I forsee myself sitting up late to see if I can get a good deal on it, if not, oh well. I am excited about getting it and trying it out!
Anyone else have a Cameo or is thinking of getting the Portrait? I have the software and have gotten a few of their Free Shapes already, you know to be prepared. ;)
Anyone else have a Cameo or is thinking of getting the Portrait? I have the software and have gotten a few of their Free Shapes already, you know to be prepared. ;)
Tuesday, November 13, 2012
Gobble Gobble
So I saw this shirt on Etsy a while back and wanted to try something like it for Ashlee. It is hard to find plain shirts around here, especially long sleeves. I remembered to look yesterday at Wal-Mart and happened to find a white long sleeve shirt! I also found a white sweat shirt but used the long sleeve T-Shirt as Ashlee tends to get hot easily.
So I gathered up some scraps, drew up a "Turkey" and got busy. Here is the before, with Mr. Eko making sure I am doing it right.

I didn't take pictures as I did it, sorry, but I just cut out different color feathers and laid them around my turkey body (brown minky). Then pinned them on and sew it on. It wasn't too hard to sew them all on, just make sure the shirt doesn't bunch under the needle. Once I got the body and feathers on, I put the eyes on. I just went around the edge, not perfect but I think it adds character. Then I used a fancy stitch for the eyes. For the legs I did straight lines, then a fancy stitch to make "feet". My mom had found the Gobble at Hobby Lobby so I sewed it on. Again not straight or perfect but I adds character. I did mess up and got a little bunch when I was putting the Gooble on but it isn't too bad. Can't wait to see my Little Bit in it.


So I gathered up some scraps, drew up a "Turkey" and got busy. Here is the before, with Mr. Eko making sure I am doing it right.
I didn't take pictures as I did it, sorry, but I just cut out different color feathers and laid them around my turkey body (brown minky). Then pinned them on and sew it on. It wasn't too hard to sew them all on, just make sure the shirt doesn't bunch under the needle. Once I got the body and feathers on, I put the eyes on. I just went around the edge, not perfect but I think it adds character. Then I used a fancy stitch for the eyes. For the legs I did straight lines, then a fancy stitch to make "feet". My mom had found the Gobble at Hobby Lobby so I sewed it on. Again not straight or perfect but I adds character. I did mess up and got a little bunch when I was putting the Gooble on but it isn't too bad. Can't wait to see my Little Bit in it.


Sunday, October 28, 2012
Life got in the way...
I did get a few things made last week (4 pillow covers and some placemats and a custom order) but I really wanted to get more done. However, my daughter started getting sick. :( She hasn't been since January when we went to see an allergist and got her meds right. She gets a runny nose then a horrible cough which we have to use her inhaler for.
I do have a laminted cotton weighted sensory blanket on the sewing table. Not sure if there is a market for those since it will not be able to be washed in the washer, hand washed with soap and water only. We shall see.
I do have other ideas in my head and hope to get time to do it. This week looks like a bust as my daughter is still sick plus I have to take our cat back to the vet on Tuesday for her checkup. Then Halloween is Wednesday; hoping our daughter is better by then so she can dress up as Jesse and get lots of candy. ;) And if we get her referral in on time, my daughter has her 6 month check up at the allergist on Thursday.
Until next time!
Sunday, October 14, 2012
If Life does not get in the way....
I hope to start adding items to the shop weekly! The first week of Ashlee's new preschool went fairly well and the teacher is very hopeful and helpful. So if all stays good, I can get back to somewhat normal and get back to sewing while she is at preschool.
Anything ya'll would like to see?
Here is what I just listed today:
 Don't forget about the 10% discount code, good through October 31st!
Anything ya'll would like to see?
Here is what I just listed today:
Thursday, October 4, 2012
National Sensory Awareness Month
October is National Sensory Awareness Month.
Our 4 year old daughter was diagnoised with Sensory Processing Disorder this past spring. She was having issues at school and one of her teachers, Miss Rachael, asked if we would be willing to see an OT for possible SPD. She had kept a child with SPD and Ashlee was showing some signs. We agreed since we had thought something was different but just thought we were overreacting. We are so grateful for Miss Rachael and Miss Krissy. They took Ashlee under their Angel Wings and helped her grow. Once we got Ashlee in OT for SPD, we saw a huge improvement at home. We did alot of research and learned to look for triggers that could be too much for Ashlee thus cause a meltdown. It was and still is hard work but with the knowledge we have now, we can help Ashlee, not hinder her. Knowledge is power. Sadly some do not have the knowledge and seem not to want to learn. Ashlee was kicked out of the preschool program where she had been going to for Mother's Day Out. The teacher could not handle her and was not willing to do the tips we suggested due to being too hard to do with 11 kids. I won't be too rude here but we found Ashlee a new school where they know about SPD and are willing to help. Today is Ashlee's 2nd day and so far so good.
So what is SPD? According to Wikiepedia:
Sensory processing disorder or SPD is a neurological disorder causing difficulties with taking in, processing, and responding to sensory information about the environment and from within the own body (visual, auditory, tactile, olfaction, gustatory, vestibular, and proprioception).
For those identified as having SPD, sensory information may be sensed and perceived in a way that is different from most other people. Unlike blindness or deafness, sensory information can be received by people with SPD, the difference is that information is often registered, interpreted and processed differently by the brain. The result can be unusual ways of responding or behaving, finding things harder to do. Difficulties may typically present as difficulties planning and organizing, problems with doing the activities of everyday life (self care, work and leisure activities), and for some with extreme sensitivity, sensory input may result in extreme avoidance of activities, agitation, distress, fear or confusion.
For Ashlee, her triggers are too much noise or too much visual. Music class was too much for her after about 10 minutes, Wal-Mart is too much after the same time frame; some days brushing her hair hurts. We have learned that if she has a toy or a game to play with while we are shopping, she does so much better. When she does have too much, is overstimulated, she will start acting out. For some reason she has chosen to say "Shut Up!" and will throw things or bite her arm. We used to put her in time out for this but now we know this is her way of saying "HELP!" So we just say "We don't use those words. Now breathe and calm down and tell me what do you need? Are you hungry, sleepy, tired?" Usually she wants some chips which she likes because of the hardness. So I will fix her a bowl of her favorite chips and sit her down to watch TV. This calms her down and she will cool off and go back to playing. There are a few times when she has just had too much and the chips do not work so I put her in time out and let her scream it out for a couple of mins. Then I go back to her and tell her again to calm down and tell me what she needs. This usually works the first time. Before we had the knowlege of SPD, her meltdowns were long and tiring for me and her. Knowledge truly is power. We have a much better relationship due to it.
One thing we were told early on in OT was to get Ashlee a weighted blanket since she likes pressure. Her OT said if I sew, I could make one cheaper than I could buy one. So since I was just learning to sew, I tried my hand at making one. My first attempt was far from perfect but it worked. I even made one for my friend whose son has Austim and SPD. Since I had opened an Etsy store, I thought I would see how well they would sell. I tweaked my design a few times before I am happy with it. I did re-do Ashlee's with the new design and it looks so much better. lol. And for selling the blankets, I have sold 7 so far! I always remind buyers to consult their OT or doctor before chosing a size and weight. But I am willing to make any size or weight with your fabric choice. So I don't just make blankets to sell, I make them because I know they work. My daughter uses one so I know the benefits of them.
I hope you made this far, if you did Yay! Now go read more on SPD because Knowledge is Power!
Monday, October 1, 2012
Halloween is here...
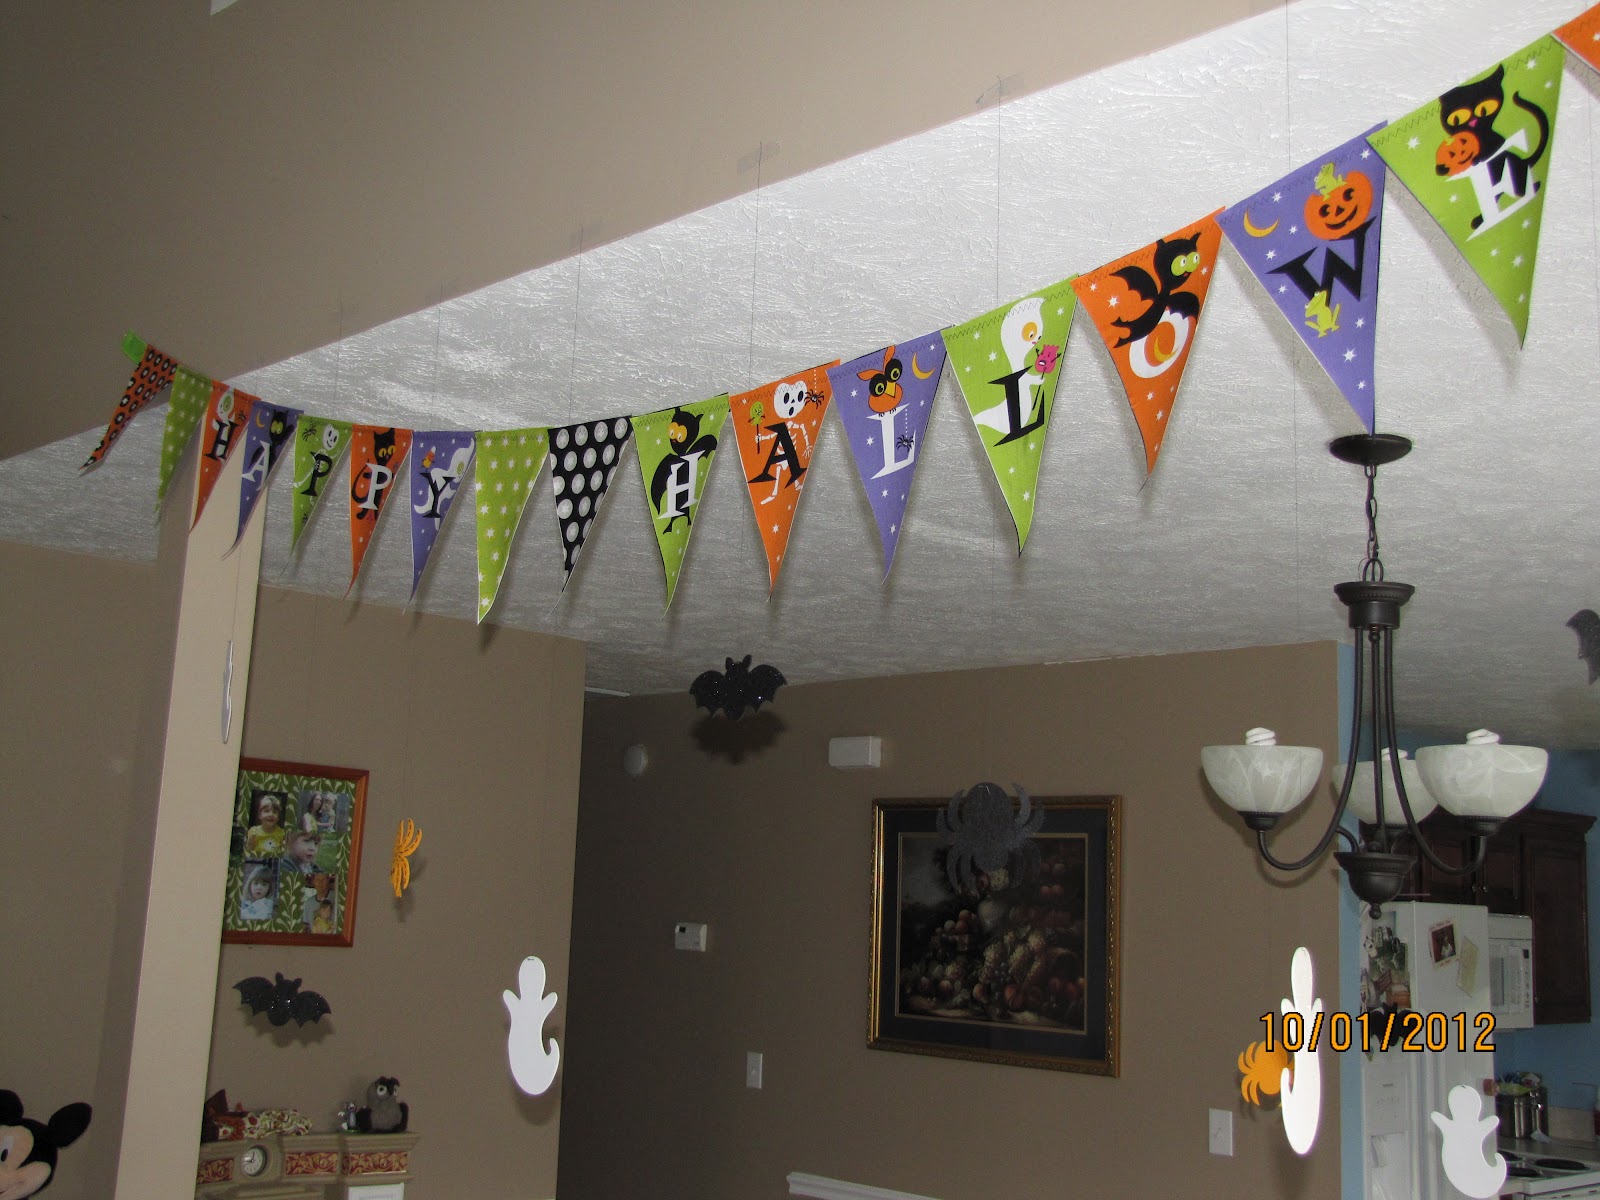
Normally I don't like to decorate much for Halloween but my daughter loves Spiders, Ghosts, etc. Go figure. lol So even though it isn't much, I got a little crafty this year. So here are my Halloween Crafts I did. And sorry for the bad pictures, it is a cold, rainy day here in TN.
First up is the Halloween Banner. I just cut the pendants out and mod podge onto cardstock then zig zag stitched them onto some ribbon. Super cute and easy.

You will also notice the hanging ghosts, bats, and spiders. These are felt or foam pieces I found at JoAnn's on sale. I just used some old thread and sewed the top part so it would hang. I pulled out the needle thread really long before I started. I have these hanging through the house. Even off the pull string for the attic door in the hallway.

Next is our little door knob hangers. I used some cardstock, scrap fabric, and some Halloween cards (from Paper Coterie). I zig zag stitched the fabric edge to the card stock, then zig zag stitched the card to the fabric/cardstock. Then I mod podge that piece to a black cardstock to cover up the stitching on the back. Punched a hole, thread a ribbon, and you have a nice little ornament. I did use a $1 stamp I got at JoAnn's for the Spooktacular on the pumpkin on.


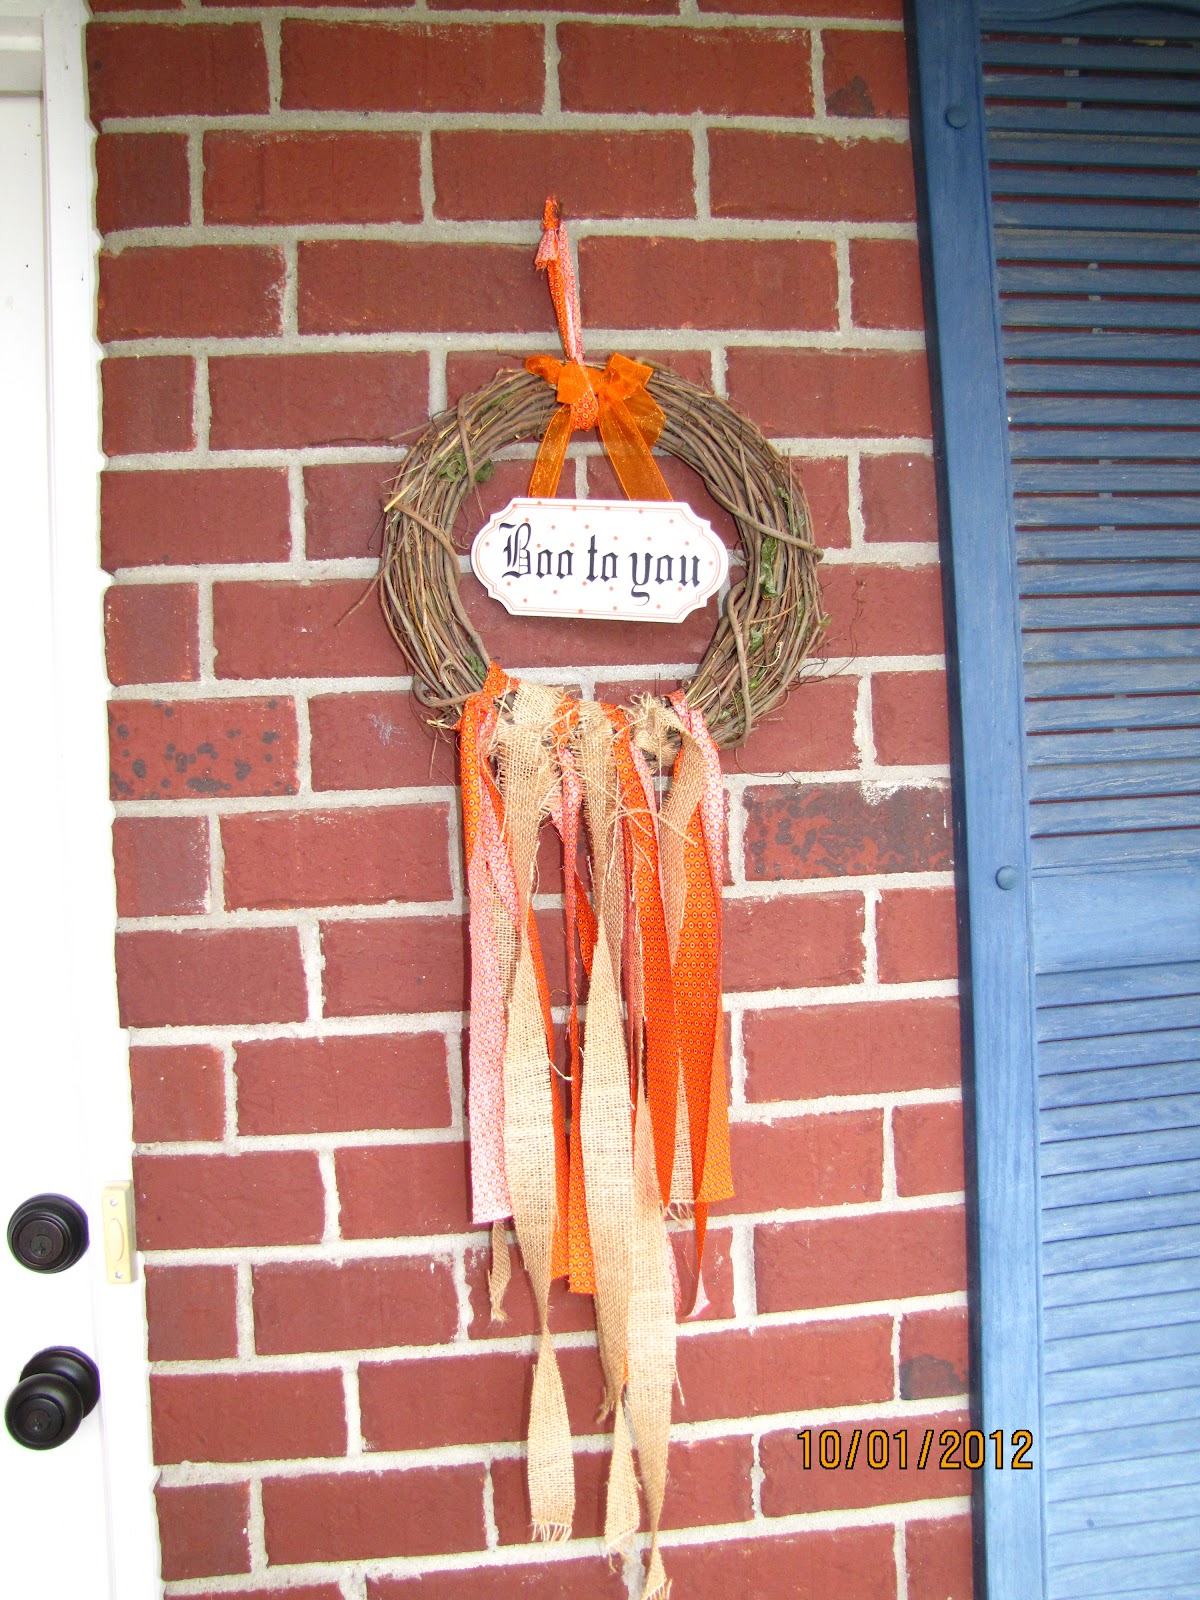
Next up is a wreath that my Mom actually made. I had made a 4th of July one and while she was visiting one week, we made up these Halloween ones. The Boo To You plaque came from Hobby Lobby. The wreath was $2.50 at Wal-Mart and we used scrap fabric and burlap.

And here are my candy jars. I used Mason Jars, and mod podge scrap fabric to the top, sprayed painted the lid black, and the just put some stickers I got, again, at JoAnn's. Super cute and easy. Our daughter loved them...she already ate all the sour worms in one of the jars...ok I helped some. ;)

First up is the Halloween Banner. I just cut the pendants out and mod podge onto cardstock then zig zag stitched them onto some ribbon. Super cute and easy.
You will also notice the hanging ghosts, bats, and spiders. These are felt or foam pieces I found at JoAnn's on sale. I just used some old thread and sewed the top part so it would hang. I pulled out the needle thread really long before I started. I have these hanging through the house. Even off the pull string for the attic door in the hallway.

Next is our little door knob hangers. I used some cardstock, scrap fabric, and some Halloween cards (from Paper Coterie). I zig zag stitched the fabric edge to the card stock, then zig zag stitched the card to the fabric/cardstock. Then I mod podge that piece to a black cardstock to cover up the stitching on the back. Punched a hole, thread a ribbon, and you have a nice little ornament. I did use a $1 stamp I got at JoAnn's for the Spooktacular on the pumpkin on.


Next up is a wreath that my Mom actually made. I had made a 4th of July one and while she was visiting one week, we made up these Halloween ones. The Boo To You plaque came from Hobby Lobby. The wreath was $2.50 at Wal-Mart and we used scrap fabric and burlap.
And here are my candy jars. I used Mason Jars, and mod podge scrap fabric to the top, sprayed painted the lid black, and the just put some stickers I got, again, at JoAnn's. Super cute and easy. Our daughter loved them...she already ate all the sour worms in one of the jars...ok I helped some. ;)

These are super easy and cheap ways to decorate for Halloween. Now to start planning for Christmas as I start decorating November 1st!
Subscribe to:
Posts (Atom)