Wednesday, January 30, 2013

Facebook Auction for a great cause

Update: Auction open: Album where you bid. Just put your paypal email and your bid in the comment on the item you want!

If you are a fan of Skye Reve Fabrics on Facebook, then you have seen that she is organizing an auction to help a family friend who has cancer at the tender age of 28, mother of 2, and whose husband just lost his job. There are some great items up for auction so please take a look around and join in for the cause on Feb 1st.

Here is the flyer:


I have a blanket (the Berenstain Bears) up for auction! Every little bit will help this young family facing this terrible times. Thanks!

Friday, January 25, 2013

In Memory of Thelma

My sweet doggie Thelma passed away August 10, 2010. I miss my girl! And since I got the Portrait, I wanted to try to create a fabric silhouette of her. This is how I did it. 

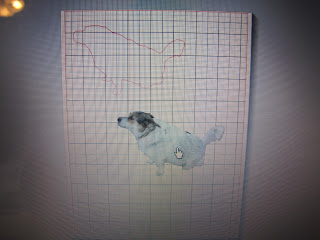
Step 1: Open up the picture you want to use in a Photo Editing software. I used PhotoShop Elements. Once opened, select the "quick selection tool", highlight the part of the picture you want to use, here I wanted just Thelma. Hard to tell but you will have "blinking" dotted lines of your selection.


Step 2: Open up a new blank file. Make sure the background is set to transparent. Now go back to the picture and drag your selection over to the new blank file. This is what you should have. Save it as a .png. 


Step 3: Go to Silhouette Studio Software and open up the .png file you just saved. 


Step 4: Go the "Trace" option. It is the 4th to last box on the right. Hit "Select Trace Area". Draw a box around your picture. It will be a blue box...sorry forgot the picture here but you will see it below.


Step 5: Turn off the "High Pass Filter", and up the "Threshold" so your entire picture is yellow, see picture below.  Hit "Trace Outer Edge".


You can move the color picture to make sure you have the trace edge you want. Move the color picture back over the tracing. If you need to adjust the size of the picture. You will first need to group both images together then resize by dragging the outer points. I didn't need to resize so I don't have picture for that step. 
  

Step 6: Pick out your fabric you want to use. Cut it at least 1/2 inch bigger around than the size of your image. Cut out your interfacing; I use Heat n Bond Lite. Iron the interfacing and fabric together; make sure the rough side of the interfacing is on the back of the fabric. Once cool, peel off the interfacing backing and put the fabric onto the Silhouette Cutting Mat. Be sure you line up the fabric just where your picture is in the Software; use the grid for guidance. Load your machine. 

Step 7: Send to Silhouette. Be sure to change the Current Settings to "Fabric Cotton Print" and check your blade setting requirement. I use the fabric blade, the blue one. Hit "Cut"

Step 8: Peel off the fabric from the mat to revel your cutting. Peel off your cutting. Place onto your item of choice. Mine is a white sweatshirt for my daughter. Iron into place. 


Step 9: Stitch into place. 

 Step 10: Enjoy!

My daughter hasn't worn her shirt yet. I plan to let her wear it tomorrow as we go ice skating for our Family Day.

Linked up at:


Wednesday, January 23, 2013

Zippered pouch with applique

This is somewhat of a tutorial. I am not the best at remembering to take pictures as I am sewing so bare with me as I learn.

So here it goes. Zippered Pouch with Applique "Tutorial"

First gather your supplies. Decide how big you want your pouch to be, mine was approx 9"x11". The interfacing needs to be smaller so it won't create bulk in the seams. Mine was a little too small but it was all I had. Normally you want it about 1/2" smaller all the way around. I used Heat n Bond for the applique, forgot to take the picture.


After you got your measurements and supplies, work on ironing. I did the applique first. 

Then I ironed on the fusible batting.

I could not get a good pic of the heart on the computer screen. Basically measure where you want your applique and how big you want it. Open Silhouette Studio, open the file you want to cut, mine was simple heart. I wanted a 2" heart so I made sure my measurements in Studio fit what I wanted. The square I cut out was 2 1/2". *NOTE* Be sure to take the paper off the back of the interfacing before cutting. I always forget this and it doesn't cut as well.  Once you have your shape the size you want.it. Lay your fabric on the Silhouette Mat, be sure you line it up properly to where you have your shape in Studio. 


Load your Silhouette Machine (I have the Portrait)

Be sure to change your cut settings to Fabric cotton print and also if you have the Fabric blade, use it and be sure to change the blade setting to 3 (shown in the lower left corner)

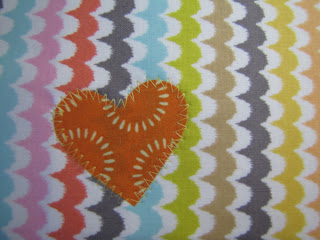
And you have a perfect heart!

Position the applique where you want it and iron it on.

Then sew it on. I chose a zig zag stitch for a more decorative look. 


Next up is to sew on the zipper. Here I have my exterior fabric right side up, zipper facing down, and interior fabric facing down; raw edges matching. Pin in place. 


Use a zipper foot to sew the pieces together. 


Repeat for the other sides. You will have exterior fabric facing up, zipper facing down, and interior fabric facing down. The side you just sewn will be sandwiched in between. Be sure just the raw edges of the new side are what is being sewn. 

Topstitch if you prefer

Now take your interior fabric and put right sides together, do the same for the exterior fabric. Leave a 3" opening on the bottom of the interior fabric. ***NOTE*** Be sure your zipper is opened halfway so you can flip it right side out!

Be sure the teeth of the zipper are facing away from the exterior fabric. Sew all a way around, minus the opening.

Trim zipper and round the corners

Start pulling fabric through opening....I am always reminded of Popples when I do this. 


Poke corners out and sew up the opening in the bottom of the interior fabric. 

Sit back and enjoy your new pouch!

Tuesday, January 22, 2013

Valentine's Day Decor

I bought a small chicken wire frame from Pick Your Plum before Christmas. I had a Christmas-y decor on it. With V-Day approching, I wanted to fix the frame up for it. I really wanted some vintage type cards hanging from it. So I went off searching. I found these and picked out a couple I liked. Since they were jpgs, I had to edit them and save them as png. I used Photoshop Elements 6 to do this. I just used the quick selection tool to select all the color, cut and pasted onto a new file that had a transparent background. Then saved as a png. Once saved, I opened my Silhouette Studo Software and opened the png file. I used the Trace option to trace the picture. I wanted just the outline so I took off the High Filter and upped the threshold so the whole picture was yellow. I did this for each picture I wanted. I then printed the files off onto cardstock then loaded that onto my Silhouette mat and cut them out. Mine did get off some but I had the mat loaded off (I should have turned on more lights but it was late). I then glued the cardstock onto twine. Once dried I attached the twine to the frame. The "Happy Valentine" I just printed out and I trimmed it down.

I know the "steps" are hard to imagine but again it was late last night and I didn't take pictures. Sorry. I will try to re-trace the steps soon and take pictures.

Saturday, January 19, 2013

Simple joys

Little Bit got some money for Christmas so we decided to take her to Toys R Us and let her pick out some new toys. She had no idea where we were going. She had fun picking out toys. She first spotted Thomas, then a big T-Rex, but she decided to keep Thomas until she found some My Little Ponies. She wanted a mini pony like one she had and wanted to put Thomas back. I told her she had enough to get both but she said no, she wanted pony and T-Rex. lol So we let her look some more. She found a baby pony with a bottle but still kept saying she wanted T-Rex so we went back to see T-Rex. As soon as I put him on the floor, she grabbed him and said "let's go!" lol So she left with T-Rex, the mini My Little Pony and the baby horse. The guy checking out said it was an odd combo. She had to carry T-Rex out. Here are some pics from our trip:

First Thomas - this is when she saw T-Rex.

 
Leaving:
 
 
On the way home:


She fixed T-Rex lunch:
 
 
She is now laying in bed with T-Rex. I hope they will take a little nap as she has been yawning.


Friday, January 18, 2013

New Floor Pillow

So I just joined the Pinterest hype within the last month or so. One thing I found was this tutorial on a floor pillow. It was cute and simple so I pinned it. ;) Yesterday I thought I would try it out since I had lots of left over batting that needed to be put to use. So I went through my fabric and decided to use the Hawaiian fabric a friend bought for me on her trip to Hawaii. It turned out bigger than my mind was thinking...and bigger than I had batting for so I did have to go buy 4 cheap pillows at Wal-Mart (total of $11). But $11 spent on this size pillow is pretty good. It is about 36" square. I did tweak the tutorial a little by adding a zipper to it. The cats and Little Bit have approved it.  No pics of Little Bit on it but she has drug it around the house and put her toys to bed on it. She is currently sitting on it watching TV.


Update: Pic of Little Bit


Wednesday, January 16, 2013

Pouch is DONE!!

I think it turned out so cute and pretty good for my 2nd pouch ever! I hope Fay likes it. I got some goodies for it today but plan to get more soon!

Here are some instagrams sneak peeks. The sewing machine (found here) was cut out with my Silhouette Portrait using the fabric blade and interfacing. Just thought a cute applique would work so well with this pouch and the reason for the pouch (Sweet Pouch Swap).

 
After cutting out the sewing machine, I thought a red heart behind it would be cut and make it stand out better. So I again used my Portrait to cut out a heart shape. I ironed both on then topstitched around them. I love how it turned out! The Portrait cuts so good for such small details.
 
Once I got all the pieces ready, I followed this tutorial to finish up the pouch.

I hope she likes it. I had fun trying to find the perfect fabric and colors...I hope I did well. :)

Here is the final project; I won't show what goodies I have inside as I want them to be a surprise. ;)

 
Close up of the Sewing Machine and Heart
 
 
Inside, with pocket


So excited to try out my Portrait for an applique. This was a "big" test for it and it passed with flying colors. After a week of having it, I am in love! I am sure you will see more projects soon! ;)
 
Until then, Keep the Faith and Hugs & Love!